Benfield’s Answers to Conduit Bending Questions
Inventor, author, and conduit marketing pioneer Jack Benfield literally wrote the book on conduit bending, as well as developing and patenting the first one-piece one-sweep solid conduit bender, in the 1930s. His pocket instruction booklet from those early days turned into the Benfield Conduit Bending Manual, which has sold more than two million copies and is still a must-have for new and aspiring electricians seeking to master the fine art of bending conduit.
Each chapter of the small booklet includes a series of questions and answers clearing up confusion about the techniques presented in the book and offering handy tips for speeding or refining the work of bending. The book is unerringly practical and simple, turning the math of bend calculations into handy rules of thumb. Below we offer an assortment of Benfield’s questions and answers that might make the electrician’s job simpler and more intuitive.
The Benfield Conduit Bending Manual is available as a printed spiral bound handbook or e-book at the “Shop” link at the top of the EC&M homepage.
Questions and Answers by Jack Benfield
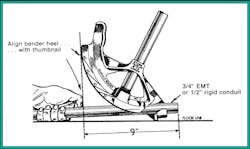
Q. Should 90° bends in small sizes of conduit (½-in. EMT, ¾-in. EMT, ½-in. rigid or IMC) be made on the floor or with tool in the air?
A. All 90° bends should be made on the floor, whenever possible (Fig. 1).
Q. If another bend has already been made in a length of conduit, the pipe may not lay firm and flat for a good floor
bend… what then?
A. Make the second bend on a slightly raised platform (a 4×4 will usually do), or bend at the edge of a loading dock, stairwell, etc. This allows firm, solid footing because the first bend hangs in free air and the portion to be bent lays flat on the floor.
Q. Is bending on carpeted floor or soft sand good practice?
A. No! Work on hard surfaces wherever possible. Bends can be made on a soft surface, but accuracy suffers — and ripples or flattening may occur.
Q. Is foot pressure really important?
A. Yes... the more foot pressure the better the bend. Pinning the conduit tight to the floor throughout the full arc assures uniform, pin-point accuracy.
Q. What stance is best for bending on the floor?
A. A wide stance (feet 28 in. to 30 in. apart) is best. The author is right-handed, but he bends using heavy pressure with his left foot. Use a stance most comfortable for you... one hand on the handle, the other hand free for body balance... keep constant stiff-leg foot pressure (knee joint stiff) throughout the full bending arc.
Q. What length handle is best?
A. 38 inches is best for ½-in. and ¾-in. size benders… 44 in. for 1-in. EMT benders and 54 in. for 1¼-in. EMT benders.
Note: Avoid longer handles than these. Longer handles are cumbersome to work with, and they invite too much pull on the handle. Remember, foot pressure is of paramount importance... avoid too much pull on the handle.
Q. What is the best method for marking conduits?
A. Use a soft lead pencil... it is good practice to girdle the conduit the full 360° with your marks. A partial mark may disappear from view because it is covered by the bending groove. A soft lead pencil or a narrow marking pencil is best. Too wide of a mark may lose pin-point accuracy.
Q. What is the best position or stance when bending over the tool (i.e., with tool in air)?
A. Keep arm pressure close to the tool (conduit under armpit helps). Allow the tool assembly to rock forward as you complete the bend.
Q. Should offset bends be made on the floor or with bender head in the air?
A. Offsets in small conduits (½-in. EMT, ¾-in. EMT, and ½-in. rigid or IMC) may be bent in the air. However, when making the second bend to complete the offset, some journeymen prefer to bend on the floor.
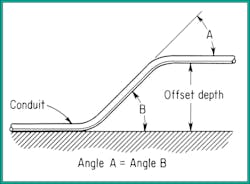
Q. How can I keep offset bends in alignment and prevent dog-legs?
A. Before you fabricate the second bend, be sure the first bend lines up in a perfect plane with: the rest of the conduit; the handle of the bender; and the tool itself... as an extra precaution sight everything into alignment with a straight board on the floor, a joint in the flooring, the seam of a carpet, etc. (Fig. 2).
Q. How do I make a double offset or, as it is sometimes called, a four-bend saddle?
A. A four-bend saddle is no more than two offsets back to back... allow just enough straight conduit so as to clear the obstruction before starting the second offset.
Q. How can I best take out an over-bend in an offset?
A. If only a few degrees of over-bend exist use the conduit as a lever and give the back of the bend a smart rap on a hard surface, such as a wood board or a hard floor. This will usually remove a few degrees of bend to bring it back into position.
Q. You say nothing about 60°×60° offsets, yet the degree scale on some benders has a 60° slash mark... how come?
A. Try to avoid 60° angle bends for offsets. Wire pulling around them is difficult. If you are extremely cramped for space, 60° bends are OK, but 30° or 45° bends are best if you have the room.
Q. Must I always mark the conduit prior to aligning the star-point for a back-to-back ninety?
A. No. To speed the work, butt the conduit end against a wall or fixed object... place a chalk mark on the floor where you want the back of the bend to lay, align the star-point with that mark, and bend. A brick, carton, or stick would serve the same purpose. Simply align the star-point with the edge of the object and bend.
Q. Suppose I want the back of a 40° bend to lay snugly against an angle surface or truss... what then?
A. You still use the star-point. The star-point foretells where the back of the bend will lay regardless of the angle (i.e., it works from 0° to 90° or any angle in between).
Q. Should I use the star-point when bending with the bender head in the air (end of handle on the floor)?
A. Yes. It works in any position. When bending conduit over the bending shoe, remember to keep constant bending pressure close to the groove.
Q. If there is no back-bend symbol on the bender, how can I establish my own mark?
A. That’s easy. Make a test bend after first marking a line on the floor and a mark on the conduit. Before bending bring the two marks into registry... after completing the 90° measure the distance from the mark on the floor to the back of the bend. The result is the “shrink” distance. Now measure the “shrink” distance back from the mouth of the bender groove, and cut a permanent reference mark into both sides of the tool with the edge of a file.
Q. Is the “gain” for EMT the same as for rigid conduit?
A. Yes... providing the radius is the same for both. However, knowing the gain is not so important on EMT because the threading operation is not involved. Obviously, it’s awkward to cut threads close to a bend in rigid or IMC conduit.
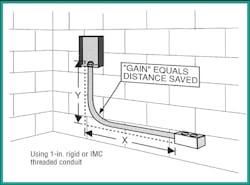
Q. How do I establish the “gain” for 90° bends of a longer or shorter radius than shown in the NEC?
A. Simply make a test bend using the radius you intend to work with. Add distance X to Y (Fig. 3) and then measure the actual length of conduit after it is bent. The difference is the “gain.”
Sidebar: Jack’s Timely Tips
Bending with tool in air: Keep hand pressure close. Tuck the conduit under the armpit. This position assures close-to-the-groove hand and body pressure. As the bend progresses, allow your body and the entire assembly to rock forward.
Avoid crooked offsets: A “dog leg” occurs when the two bends of an offset are not in the same plane. To avoid this, bend the second half of the offset just a tiny bit (8° to 10° or less)… then sight down the pipe… if the bends are out of line, twist the conduit into correct alignment. As you complete the offset, the “dog-leg” will disappear.
Make it your custom to use 30° bends for most offsets. Wires pull easier! A straight up handle (vertical to the floor) indicates that a 30° bend has been made… and to establish the distance between bends the 30° multiplier is simply 2. (No fractions to multiply.)


