What Happens When the Test Fails?
Most test failures can be blamed on poor workmanship issues that can be found within a few meters of the link's end points
In a perfect world, network installers would simply complete their work and conduct successful certification tests every time. However, tests of installed links will always result in failures, which can drive up costs for installers. Knowing what to do when the test fails can often be the make-or-break difference between turning a profit on a network installation or suffering a loss due to excess troubleshooting expenses.
The key to cost effective troubleshooting lies in a combination of technical expertise and specialized tools and knowing when and how to use them. Installers need to follow some logical steps to identify the problem before investing time and money in pursuing more complex possibilities.
Several critical troubleshooting issues can come into play whenever a link fails the testing process. The first step is to focus on quickly and systematically eliminating the most likely problem sources, such as bad connectors, cross-terminations, or other workmanship issues that are typically found within a few meters of the link's end points. When necessary, you'll need to be able to efficiently “drill down” to discover and diagnose those faults that are more difficult to find and fix. They can result from scrapes, stretches, abrasions, or splices in copper cabling or from cuts, scrapes, or coupling losses in optical cabling. In this second-stage troubleshooting process, installers often need to be able to not only identify problem areas but pinpoint specific fault locations along the length of the cable.
It's also important to invest in test equipment tailored for efficient field-level diagnostics. Cost effective troubleshooting requires specialized diagnostic tools that combine comprehensive testing and analysis capabilities with several features.
Eliminate the obvious failures first.
For the most part, test failures can be blamed on workmanship issues at the point of installation. Almost all cable manufacturers have refined their processes to approach or achieve Six-Sigma quality levels, allowing them to produce millions of feet of cabling with very consistent characteristics and capabilities. Therefore, the majority of failures are introduced through the process of pulling, cutting, and terminating cabling to form specific network configurations.
For the most part, today's cabling is also impervious to inadvertent damage from bends, kinks, twists, or knots along the length of a link, so installers can begin their analysis by looking at the endpoint terminations and/or any known splices within the link. Some of the most frequent failure modes involve simple miswiring of the connectors, punching a pin down incorrectly, or mixing an “A” wired panel with “B” jacks. As more electrical contractors have gotten into the LAN cabling market to expand on their core services, it has become even more important to focus on these workmanship standards.
For obvious workmanship issues like miswires, the most appropriate troubleshooting method is visual inspection. Some basic test tools can help installers know where to look, but they must fully understand their craft to know how to spot faulty terminations. Most importantly, the best preventive measure for poor workmanship is rigorous installer training and rigid adherence to quality standards and methods.
In addition, some compatibility issues make it difficult to match connectors and components manufactured by different vendors, especially in Cat. 6 or Cat. 7 environments. Most connector and cable suppliers will claim full cross compatibility, and such claims are generally true now for Cat. 5e. It's a good idea, however, to ask vendors about any specific recommendations regarding optimal matching between components.
If you've used the correct connector hardware and have verified the wire-map integrity, then it's time to drill a little deeper into the next level of potential problem areas. Some of the more subtle failure modes at the link endpoints can involve issues like excessive untwisting or retwisting of the wiring pairs, which can degrade the integrity of the cable and cause crosstalk problems. Changing the relationship between twisted pairs within the cable can alter the capacitance characteristics enough to change the impedance and create crosstalk. You can also experience a crosstalk failure by erroneously plugging a Cat. 5 jack into a Cat. 6 panel. Overall, crosstalk issues are typically the most common failure mode after basic wire-map workmanship issues. In most instances, the first response to a near end crosstalk testing (NEXT) failure is to simply remove the offending connector and reterminate it.
Again, it's important to keep in mind that the overwhelming majority of crosstalk problems will occur in proximity to the endpoint terminations on the network link. Therefore, most installation contractors can get by with NEXT.
When, why, and how to use TDR.
Using the 80-20 rule, it's reasonable to estimate that 80% of failures occur within a few feet of the link's endpoints. However, the other 20% of failures along the remaining portion of the link can often require more than 80% of the troubleshooting time. If it isn't possible to readily identify the failure sources for a link at or near the endpoints, then installers need to go to the next level of sophistication to find fault conditions hidden inside the cabling jacket. This can be especially important in real world situations where the cable has been pulled through walls, ceilings, or cabling ducts.
Faults anywhere along a length of cable can be detected and precisely located with a device that employs time domain reflectometry (TDR). TDR is the process of analyzing a cable — metal or fiber optic — by applying pulsed signals on one end of the cable and examining the reflection of that pulse with a technique similar to radar.
In copper cabling, TDR can measure cable length and locate specific areas of impedance mismatch by transmitting a fast rise-time pulse down the cable under test and then monitoring the cable for constant voltage in order to detect any reflections of the transmitted pulse. Any anomalies in the cable that change the capacitance, inductance, or resistance will result in measurable differences in impedance. Think of impedance mismatches as disruptions in the flow or back-pressure that alter the actual time for propagating the pulse vs. the nominal propagation rate. These impedance mismatches anywhere along the length of the cable cause reflections that are then displayed on the TDR's output. A significant reflection also always occurs at the end of the cable.
If a cable is metal and has at least two conductors, it can be tested by a TDR. Devices with TDR capabilities will troubleshoot and measure all types of twisted-pair and coaxial cables, both aerial and underground. Based on the cable's nominal velocity of propagation (NVP), which is dialed into the TDR prior to testing, the unit can measure the time it takes for the transmitted pulse to be reflected from the far end of the cable. By manipulating the instrument's controls, it's possible to calculate the absolute length with some degree of accuracy.
Impedance mismatches will also be identified wherever they occur down the line, making it possible to locate conditions like cable type changes, bad vampire taps in coax, and pair splits. Devices with TDR can locate and identify faults in all types of metallic paired cable, including both major or minor cabling problems like sheath faults, broken conductors, water ingress, loose connectors, crimps, cuts, smashed cables, or shorted conductors. Such analysis can be especially valuable for locating cable quality problems like corrosion, stretching, crimping, incomplete shielding, and other defects that are visually undetectable.
Historically, TDRs have been considered relatively sophisticated, reserved for only large companies and high-level engineers. Although TDRs are widely used in the telephony industry, LAN network installers have been slow to adopt TDR technology due to the complexity of operation and the high cost of the instruments. However, TDR functions integrated directly into cable testers have become more advanced, making it easier to operate them and much simpler to interpret the results.
In order to optimize user productivity, the TDR capability in cable testers should include a graphical display of impedance, or % reflection, vs. length characteristics to pinpoint the distance-to-fault conditions. In addition, TDR cable test functions should also incorporate flexible pan and zoom functions to enable the operator to target detailed sections of either the horizontal axis, which represents cable length or vertical axis, which represents impedance. Although the TDR functionality isn't normally required during routine pass/fail testing, it should be readily accessible at the operator's discretion to perform on-the-fly diagnosis of cabling problems, whenever more in-depth analysis is required.
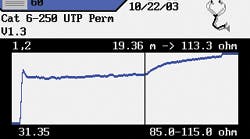
The integration of full-featured TDR capabilities into multi-function field test equipment makes it possible for field installers to leverage the devices' familiar operating interface, while also accessing the power of TDR. Such a device can provide an accurate picture of the TDR trace, showing the distance to the event as well as the event's magnitude. For field-level troubleshooting, the ability to discern differences in the magnitude can be quite helpful for locating return loss failures and identifying marginal problems or latent issues even when the overall link may not be exhibiting a “hard failure” on total impedance tests. Visual displays, such as the one shown in Fig. 1, can enable the user to identify the precise distance to an anomaly or “event” anywhere along the length of cabling. While this doesn't tell the installer exactly what's wrong, showing them where to look can streamline the troubleshooting process.
The thorough cleaning of fiber connections can be a major workmanship issue in fiber optic networks. All too often, installers who are unfamiliar with the physics of light propagation will assume that if connectors and launch cables appear clean to their naked eye, then the connection will provide acceptable performance. For example, Fig. 3 shows display data for the same fiber link before and after the cleaning of connector interfaces. Having a field inspection microscope available can be useful for spotting problems when testing and troubleshooting fiber links.
For most contract network installers, a full OTDR system can be both too difficult to learn and use as well as too expensive for routine deployment. While it can provide a variety of detailed data about the intricate light propagation characteristics within a fiber link, little of that information is useful for field troubleshooting. Instead, capabilities that can profile relevant failure modes and provide location information that enable technicians to quickly find and fix the fault are more useful.
The width of the light pulse also plays an important role in the use of fiber diagnostic tools. Shorter pulses typically provide greater resolution and have shorter dead zones, but they have less dynamic range and more noise. In contrast, longer pulses have less resolution and wider dead zones but can provide better dynamic range and less noise. Depending upon the overall fiber link's length or the number and location of connections, either a short or long pulse can offer better data.
The bottom line.
When all is said and done, effective troubleshooting will always require a complementary interaction between the diagnostic tools and the field technician. There will never be a “universal automatic bug-fixing device” that can solve problems without a knowledgeable hands-on user. Likewise, even the most expert technician would be lost without the proper tools to help locate and diagnose fault conditions, especially when they're buried deep within the walls and crawl spaces of a building.
Cantrell is a field sales manager with Ideal Industries in Osceola, Mo., and Munch is a principal with National Datacom Solutions, Inc., in San Diego.


